
Hillside Playgrounds – Designing with Topography

Written by Sonya Wilson
Utilizing hills and mounds in your playground design is a win-win situation for you, your clients and the kids who play on them. Hillside playgrounds are awesome to play on, roll down, climb up, hide behind, crawl through, look out from, slide down, and be king or queen of. The benefits of hillside playgrounds for children from a developmental perspective are numerous, as are the benefits of using them for small play spaces like daycares and pocket parks. For smaller budget projects, creating mounds offers an alternative to additional equipment. By transforming the land when designing, hills offer a pleasing change of scenery.
Hills, berms or mounds add visual interest, transforming an otherwise flat play area.
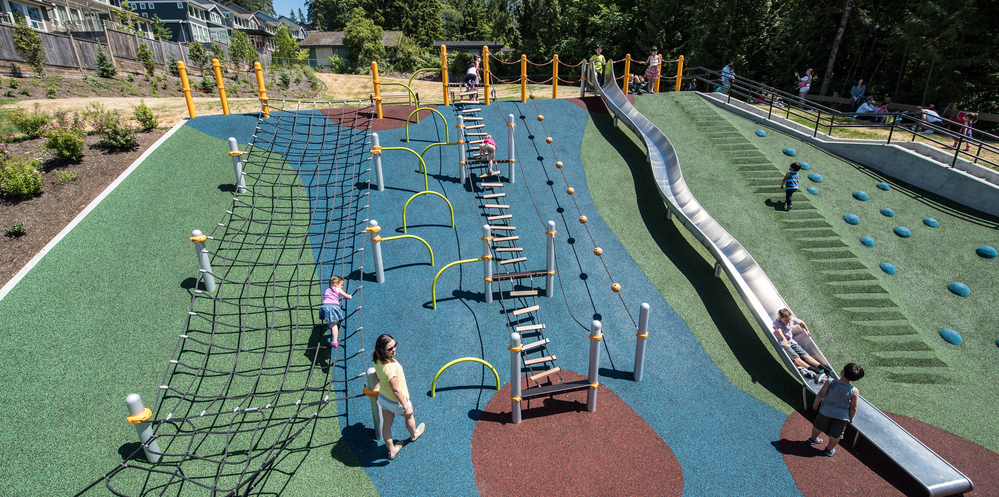
Hills and mounds are one of the most flexible play pieces because there are no prescribed ways to interact with them. Kids get to choose how to play on them, challenging their imaginations and bodies in different ways. Hillside playgrounds offer interesting options for inclusive design and inspire excitement. Small mounds clustered close together are engaging for younger children while a larger hill with a rope pull and a transfer station with ramp access to a slide will keep older kids occupied and engaged.
Developmental Benefits of Hillside Playgrounds
- Builds strength – children climbing up a hill on their own, or using a rope pull or hand holds
- Develops balance – children getting themselves up and down and around and over a cluster of small mounds
- Stimulates the vestibular system – rolling down a hill is like spinning, but on the ground
- Engages the imagination – encourages social play for kids of all abilities
Kids love to challenge themselves and will construct ways to do that on just about any piece of play equipment. Taking risks is part of healthy development. Designing a playground with a climbing structure on top of a hill or mound, including a variety of ways to access that climber, adds height along with perceived risk by the user.
Top 3 Reasons Why You Want to Include Hills in Your Playground Design
- They work well in small spaces – you can build a mound with an embankment slide that doesn’t require the safety zone a climber with a slide would need
- Offers alternate play options for budget conscious projects – the mound is itself a component
- Countless play possibilities and configurations for a playground design – different ways to climb up and down the hill (rope pulls, cables, handholds), slides, bridges connecting hills, tunnels through hills, interesting accessible designs
Technical Details of Designing Hillside Playgrounds
On a finished playground, mounds are visually appealing and exciting. However, what seems simple in completed form takes some careful construction planning.
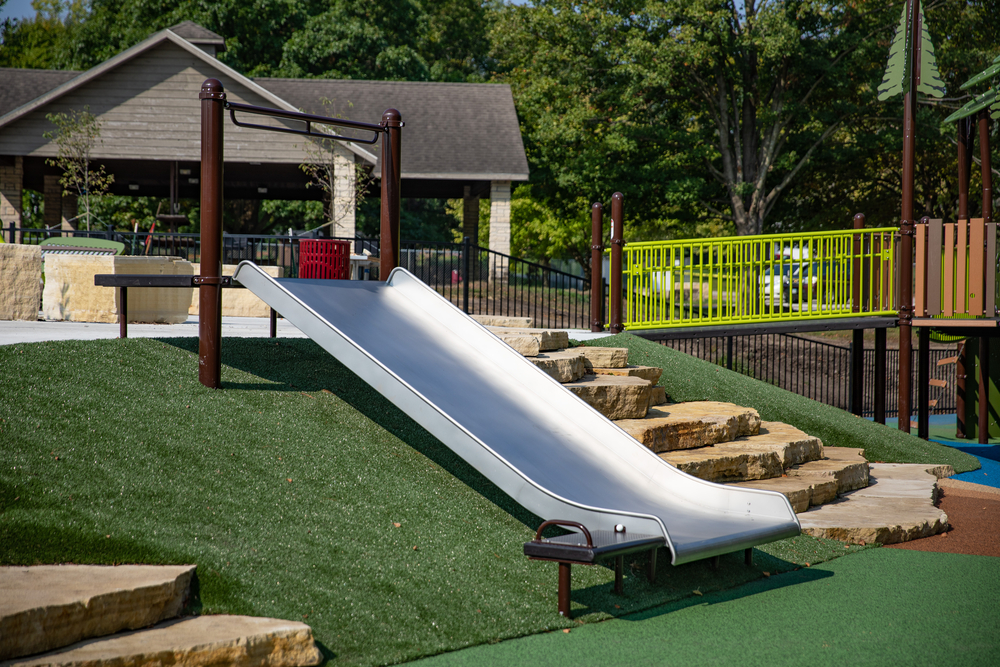
Slides are one of the most popular features to use on a hill or mound. The single most important thing to know when adding a slide to a hill is being very accurate on the slope specifications of the slide. Having the slope correctly identified will ensure that the slide is flush with the hill from top to bottom. This goes for adding a slide to an existing hill or building a mound to fit a slide.
Arron Jackson, Habitat Systems’ lead playground designer, has these tips to offer on designs utilizing hills:
- Coordinating slope with a specified slide is crucial to having a safe and attractive embankment slide. Matching the rise and the run with the specified slide for the mound ensures the slide can be considered an ‘embankment slide’ as per CAN/CSA-Z614-14 playground standards.
- If the slide bed is less than 12” from the hill for the entirety of the slide, then a 6ft safety zone is only required at the slide landing, not in the 6ft area on either side of the slide. This allows climbers, steppers, and rope pulls to be situated closer to the slide bed.
- There is always a 21” clearance zone on either side of the slide bed in which no obstruction can be placed.
- If a slide bed at any point is more than 12” from the hillside, then it is considered a ‘hillside slide’ and requires a 6ft fall zone on either side of it.
- All embankment and hillside slides should have a flush entrance point to avoid a 6’ fall zone at the top of the hill.
- As long as a mound has proper fall attenuation it may land in the 6’ fall zone of an adjacent play piece.
- It is up to the designer to determine a component’s distance from a mound to maintain safe spacing for kids tumbling down a hill
Activating a hill with a slide, tunnel, climbing, or ropes has become a very popular trend. Knowing how to properly design the play activities on a hill or slope per playground standards will result in an exciting, challenging, and new experience for the kids without unintended injuries. In most situations, when incorporating play elements on a slope, I like to start with the fixed variables (for instance, the slope of the slide or length of the tunnel). The hill can then be designed around those elements while some portions of the hill have more gentle slopes to accommodate younger or more timid kids.
Justin Wilson, PLA, ASLA, Playground Designer
More on Designing with Mounds and Hills
When considering creating mounds for a play space, think down as well as up. You can dig down to create undulating topography and include tunnels that go through a mound.
If building up a mound or adding play elements to an existing hill, think about rope pulls, integrated steps, embankment slides, climbing nets, and bridges and transfer stations that link mounds to each other and to other play structures.
Remember to look at sight lines in relation to access and egress through the play space, considering how the kids’ playing will flow through the playground.
Construction of Mounds – A Brief Overview
To construct mounds at ground level, you would typically use 3/4 inch road gravel to build it up and shape it. A 2” concrete cap goes over this base to maintain the shape of the mound and avoid any soft spots developing over time. A rubber base mat would then be poured over it, followed by either a topcoat of poured in place rubber surfacing or an artificial turf overlay. If an existing hill is being used, which may need grading or extra build up, a rubber base mat would also be used over that, followed by the finished surfacing.
When constructing mounds on a roof top, in most cases, road base is too heavy to use. Instead, blocks of foam are used and built up, Lego-style, and shaped. For example, if an embankment slide was being installed, the slide, including posts, deck, and hood, would be surface mounted (bolted down) onto a poured cement housekeeping slab. The foam would be built up under it, followed by a rubber base mat and finished surfacing choice.
Using elevation changes on a playground creates exciting possibilities and different options for inclusive design. Habitat Systems can offer ideas, designs, layouts and technical support for your playground vision.
Start Planning Your Playground Project
Jack and Jill went up the hill. And over the hill and through the hill, behind the hill and between the hills. And when they tumbled down the hill, they laughed and yelled, “let’s do that again!”